Add and edit partners
Create a customer or vendor, change their details, and remove partners you no longer deal with.
Show the steps for
Add a customer or vendor
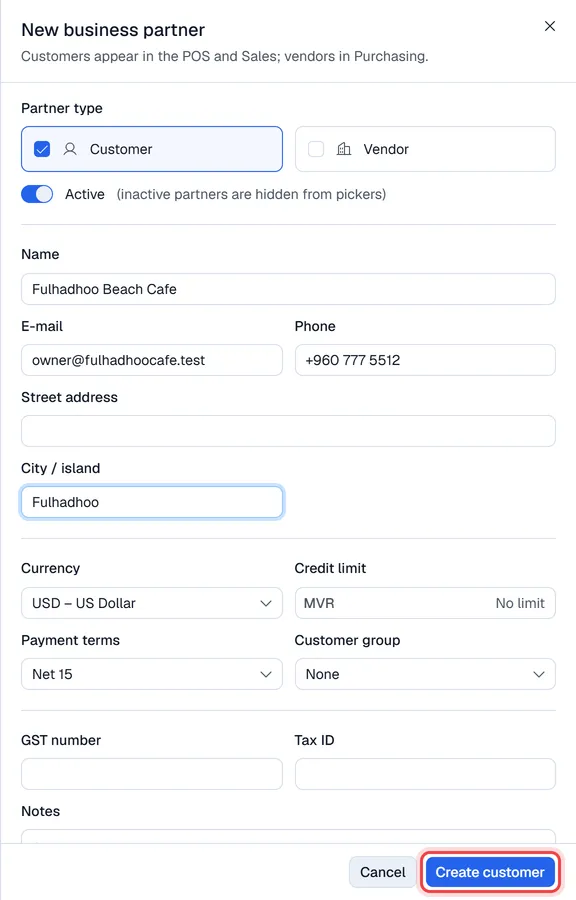
- 1In Business Partners, click New customer (on the Vendors list the button is New vendor). The form opens on the right.
- 2Under Partner type, choose Customer or Vendor.
- 3Enter the Name (the only required field) and, if you have them, E-mail, Phone, Street address and City / island.
- 4Check the Currency, and optionally set a Credit limit and Payment terms. See Currencies, credit limits and payment terms.
- 5Add a GST number, Tax ID and Notes if needed.
- 6Click Create customer (or Create vendor).
Voltix gives each new partner its own number: customers C-0001, C-0002 and so on, vendors V-0001 and so on.
The partner is created in SAP Business One first. When SAP accepts it, a message shows the new SAP card code, for example Customer created in SAP as C00125. If SAP refuses, nothing is saved in Voltix and the form shows SAP's message; correct it and try again.
Create customers and vendors in QuickBooks. They appear in Voltix after the next sync. A partner created in Voltix is not sent to QuickBooks, so its invoices cannot be posted to QuickBooks.
Add a customer while you sell
In the Sales app, salespeople with the right permission can add a new customer straight from a quotation or invoice. See Sales setup.
Change a partner
- 1Click … at the end of the row and then Edit, or click the row and then Edit.
- 2Change what you need.
- 3Click Save changes.
Changes are sent to SAP first. If SAP refuses them, nothing changes in Voltix.
Delete or deactivate a partner
Click … at the end of the row, then Delete partner, and confirm. The partner is not erased: it is made inactive, so it disappears from the list and the pickers, but old sales and purchases still show its name.
Switching Active off in the form has the same effect.