Setting up Sales
Before your team starts selling, decide the company rules, create at least one Sales profile and give people access. This is a one-time job for an administrator.
Show the steps for
1. Give people access
- 1Open Settings → Users, edit the user and switch on Sales under App access (this company). The Sales tile appears on their apps screen.
- 2Open Settings → Authorization, edit the group the user belongs to and tick the Sales permissions they need.
| Permission | Lets the user |
|---|---|
| Sales: use | Open the app, create quotations, sales orders and drafts, and see the documents their profile allows. |
| Sales: see all documents | See every Sales document of the company, not only their own. |
| Sales: create invoices | Post invoices (paid now or on credit) and returns. |
| Sales: approve | Approve or reject documents waiting for approval. |
| Sales: create customers | Add new customers from Sales (when the company allows it). |
| Sales: settings | Change the settings and profiles described on this page. |
The maximum discount a user may give without approval, and whether they may change prices, are also set on the auth group. They apply to Sales and the Point of Sale alike.
2. Set the company rules
Open Settings → Sales and stay on the Rules tab. The How Sales works card holds the rules for the whole company.
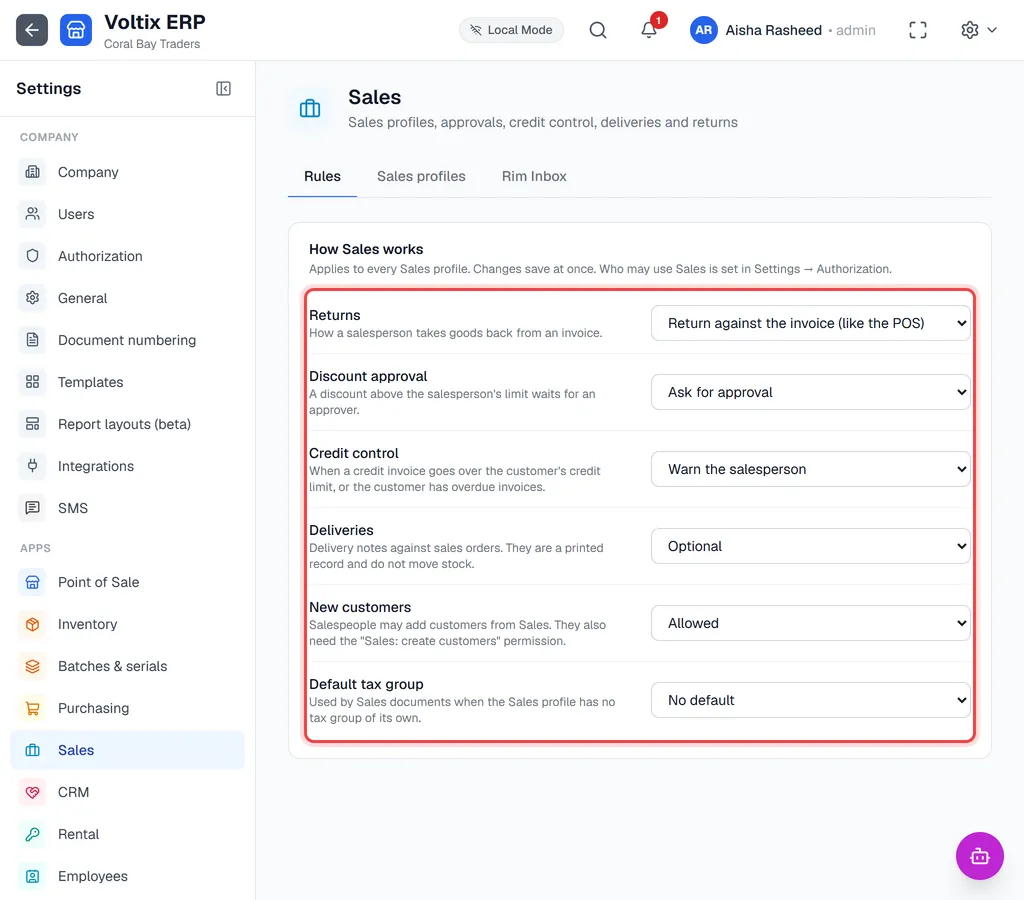
| Setting | Choices |
|---|---|
| Returns | Return against the invoice (like the POS: a negative invoice) or Credit memo. See Returns and credit memos. |
| Discount approval | Ask for approval when a discount is above the salesperson's limit, or Block discounts above the limit altogether. |
| Credit control | What happens when a credit invoice goes over the customer's credit limit, or the customer has overdue invoices: Do not check, Warn the salesperson, or Needs approval. |
| Deliveries | Not used, Optional, or Required before invoicing. |
| New customers | Not allowed or Allowed. Salespeople also need the Sales: create customers permission. |
| Default tax group | The tax group Sales documents use when the Sales profile has no tax group of its own, or No default. |
Each change is saved as soon as you pick it.
3. Create a Sales profile
A Sales profile holds the defaults for a group of salespeople: which customer, price list, warehouse and tax to start from, how documents are numbered and which payment methods they may take. One profile is enough for most companies; add more for branches or teams that number documents separately.
- 1In Settings → Sales, open the Sales profiles tab and click Add profile. To change an existing profile, click the pencil on its card.
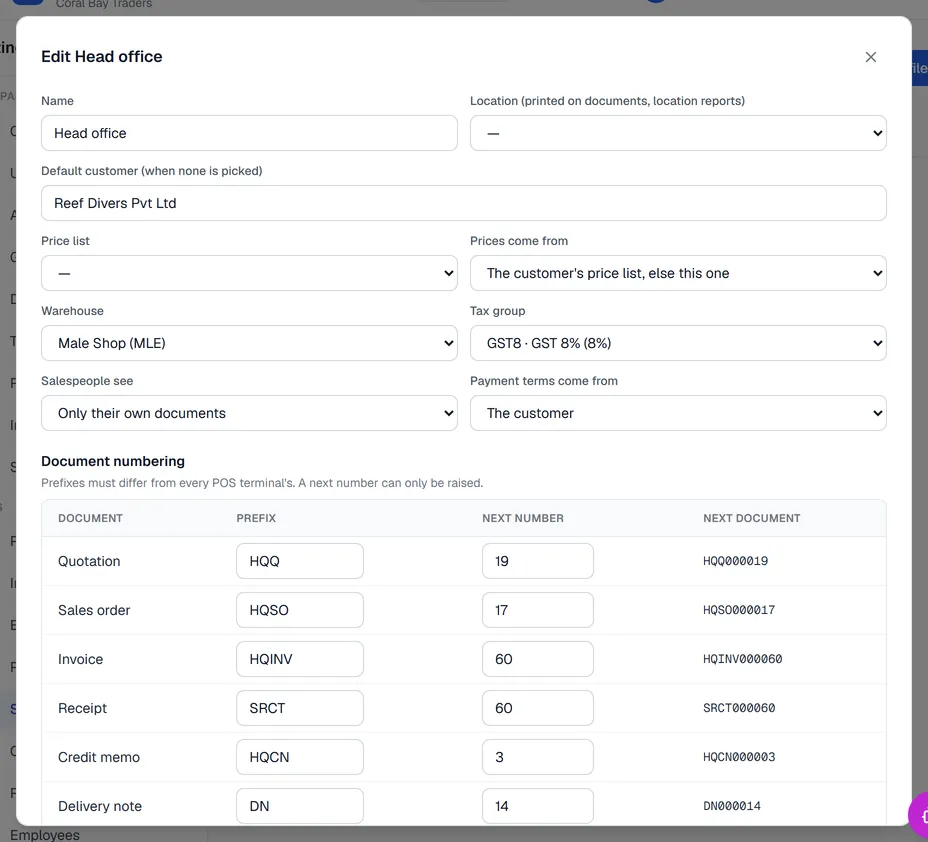
- 2Fill in the profile: - Name, for example Head office sales. - Location, printed on the documents and used in location reports. - Default customer (when none is picked), usually your cash customer. - Price list and Prices come from: the customer's own price list (falling back to this one), or always this price list. - Warehouse and Tax group used for new lines. With No tax, the company's Default tax group from the Rules tab is used. - Salespeople see: all Sales documents, only their own, their own plus their locations', or their own plus their CRM team's. - Payment terms come from: the customer, or the company default.
- 3Under Document numbering, enter a Prefix and the Next number for each document: quotation, sales order, invoice, receipt, credit memo and delivery note. Next document shows the number the next one will get. Leave a prefix empty to use the automatic one.
- 4Under Currencies for "all currencies" customers, tick the foreign currencies a salesperson may choose for customers who can be billed in any currency.
- 5Tick Company default if this profile is for everyone who has no other profile, keep Active ticked, and click Save profile.
Who uses which profile
Click Who uses it on a profile to link it to locations or users. When a person opens Sales, Voltix picks their profile in this order: their own user, then their location, then the default profile. Someone with more than one profile can switch at the top of the Sales screen.
4. Payment methods and accounts
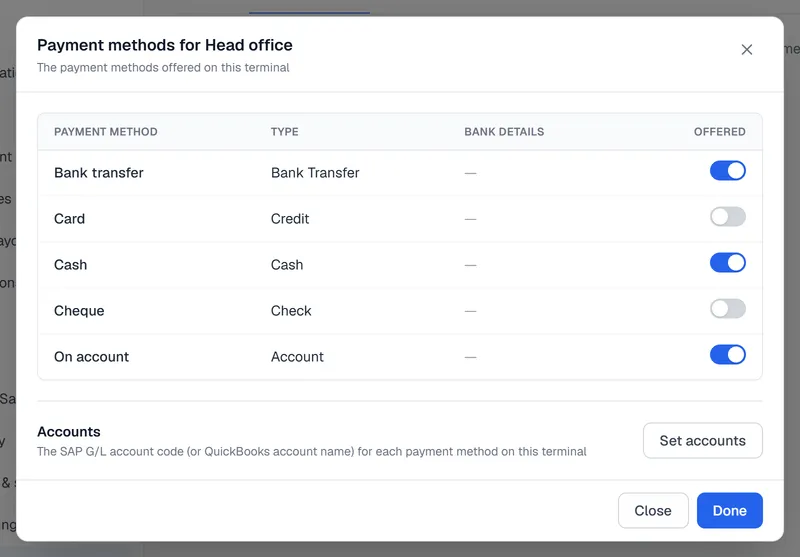
- 1Open the Sales profiles tab and click Payment methods on the profile.
- 2Switch on Offered for the methods salespeople may take when an invoice is paid immediately (cash, bank transfer, cheque, card…).
- 3Under Accounts, click Set accounts, enter the account for each method and click Save accounts.
- 4Click Done.
For each method, enter the SAP G/L account code the money goes to, for example your cash account for cash and your bank account for transfers. Voltix uses these accounts when it sends the payment to SAP.
For each method, enter the account code the money goes to, for example your cash account for cash and your bank account for transfers. With the Finance app, the automatic journal entry for a payment taken in Sales uses this account. The receivable, revenue and tax accounts are set in Settings → Finance, not here; see the Finance guide.
For each method, enter the QuickBooks account name the money goes to. Payments taken in Voltix are recorded on the invoice; the invoice itself is sent to QuickBooks.
You are ready
Open Sales from the apps screen and create your first quotation.